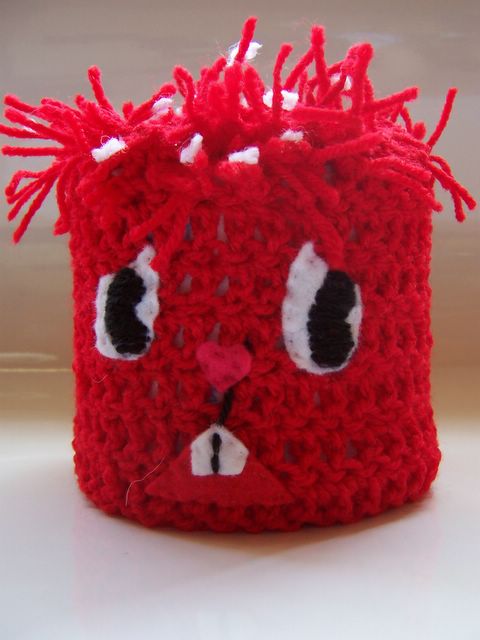
I'm writing this from work because I've almost used all my download limits for the month (I'm pretty sure most of it was on craftster!), so I'm annoyed for two reasons.
1. I have to take a break from craftster (the horror).
2. I've got some pictures to post.
Anyway, there probably won't be a huge backlog because I've got a busy week this week (salsa lesson, journal/nerd club, going home for the weekend and a date - ooooh, should be fun, or nerve wracking or something) but I'll be giving my mum her blanket when I go home so hopefully she'll like it. I've finally (and unwillingly) taken it off my bed because it's very cold here so she better like it otherwise it's coming back with me!
Tuesday, June 20, 2006
Sunday, June 18, 2006
Leg warmers
Do you like my snuggly leg warmers? They are nice and warm (which is good with the cold weather here) and since I've made them I've been wearing them under my pants and they make quite a difference!
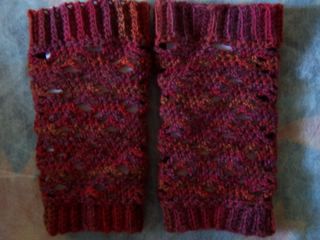
Leg warmers
The pattern is Lacy Leg Warmers and I found it to be reasonably challenging, mainly because the pattern changed for each round so I had to pay attention. I had to force myself to start the second one because of my short attention span, but once I started it, that one went a lot quicker because I'd pretty much got the pattern by then. I've got slack with a few 'pair' items, I think I've got a solitary slipper in Melbourne, and I've got a solitary arm warmer here, although that was my own pattern which I didn't write down so I might need to unravel that one and start completely again...if I get round to it.
Unfortunately I think with the yarn I used it doesn't show off either the lace or the yarn to it's best advantage. I've probably got enough left to make a panta, which should be nice, although it'll be quite close in colour to the one I've got so maybe it'll be a gift for someone. I guess I have to make it first! Hopefully that'll show off the colour changes in the yarn a bit better.

Leg warmers

The pattern is Lacy Leg Warmers and I found it to be reasonably challenging, mainly because the pattern changed for each round so I had to pay attention. I had to force myself to start the second one because of my short attention span, but once I started it, that one went a lot quicker because I'd pretty much got the pattern by then. I've got slack with a few 'pair' items, I think I've got a solitary slipper in Melbourne, and I've got a solitary arm warmer here, although that was my own pattern which I didn't write down so I might need to unravel that one and start completely again...if I get round to it.
Unfortunately I think with the yarn I used it doesn't show off either the lace or the yarn to it's best advantage. I've probably got enough left to make a panta, which should be nice, although it'll be quite close in colour to the one I've got so maybe it'll be a gift for someone. I guess I have to make it first! Hopefully that'll show off the colour changes in the yarn a bit better.
Wednesday, June 14, 2006
A short shirt story
Once upon a time there was a green shirt

This shirt was accidentally put in the wash with a red shirt...
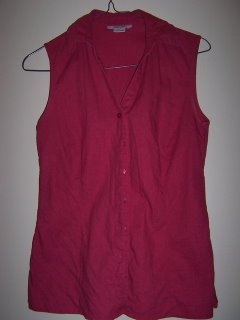
...which unfortunately ran.
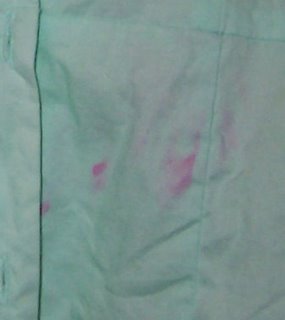
It was very lucky it wasn't a white shirt,
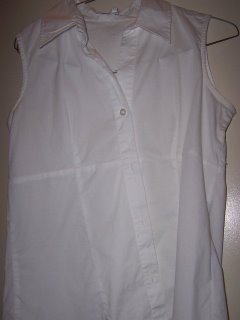
because it would have turned pink.
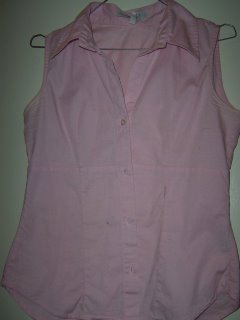
(pink shirt used as an example only, no white shirts were harmed in the making of this post)
To hide the green shirts blemishes cosmetic surgery was performed...
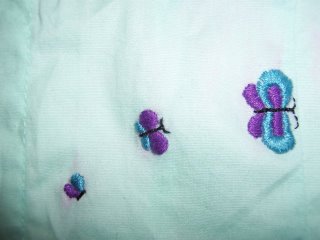

...and the green shirt was saved and made beautiful. And all the shirts lived happily ever after (until the next time one of them got dirty).
Note: I have a number of shirts in the same style in different colours. Currently most of them need ironing.

This shirt was accidentally put in the wash with a red shirt...

...which unfortunately ran.

It was very lucky it wasn't a white shirt,

because it would have turned pink.

(pink shirt used as an example only, no white shirts were harmed in the making of this post)
To hide the green shirts blemishes cosmetic surgery was performed...


...and the green shirt was saved and made beautiful. And all the shirts lived happily ever after (until the next time one of them got dirty).
Note: I have a number of shirts in the same style in different colours. Currently most of them need ironing.
Sunday, June 11, 2006
I went to a party!
I gave my friend the Dammit Doll and she loved it which is good! She said it would definately come in handy, although it got put away in a safe spot after one of the dogs tried to eat it. Such a cute dog though so all is forgiven!
The house warming was good too. It was a bit over a 6 hour drive each way (yes, I probably am insane to drive that far and only stay for one night!) but once I eventually got there I had lots of fun. There were quite a few people there from university so it was good to catch up with them after about three months. It was good to hear what everyone was doing, because it's hard to keep up just with emails.
In other news I finally got off my bum and became a friend of craftster. I've been meaning to for a while but just didn't really want to buy stuff off the internet, but I found some other stuff that I wanted to buy and couldn't find anywhere else I looked so I figured as I had my credit card out I may as well support such a worthy site!
Friday, June 09, 2006
Dammit Doll
I've got another housewarming coming up, and we make fun of this friend a bit because she can get a little angry sometimes, so I thought I'd make her a Dammit doll. For those of you who don't know what Dammit dolls are, this poem might explain it a bit.
Whenever things don't go so well...
And you want to hit the wall and yell...
Here's a little dammit doll
That you can't do without.
Just grasp it firmly by the legs
And find a place to slam it
And as you whack the stuffing out
Yell, "DAMMIT! DAMMIT! DAMMIT!"
This was quite a good project for getting rid of scraps. It didn't take much of any colour and I stuffed the limbs and body with short, otherwise useless lengths of yarn (from the afghan), and the hair was also made with short bits of yarn, although I ended up having to cut a few extra bits, but from pieces of yarn to short to do much else with. I also stuffed the head with a couple of plastic bags so you get a nice satisfying sound when you whack it against something.
I attached the poem (using a small left over piece of pretty card) with a small bit of ribbon off a clothing label, so in the end I didn't have to buy anything new for this, and I used some other recycled materials.
I bought my friend some glasses too, they always come in handy, and I couldn't spend nothing on her!

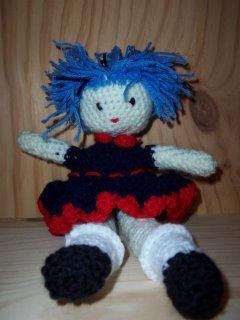
If anyone wants to make their own here is a pattern. I wasn't really counting stitches as I was going so that's why there aren't complete stitch counts. As well as that I'm sure there are errors and inconsistencies in this pattern but if you find any let me know and I'll correct it here.
Legs
Start in shoe colour.
Chain 4, sl st in first st.
Ch 1 (counts as first sc), 5 sc, sl st in first st (6)
Ch 1, sc in same st, 2 sc in each sc, sl st in first sc (12)
Ch 1, sc in each st, sl st in first sc (12)
(do 5 times in total in shoe colour for shoes)
(do 7 times in total in sock colour for socks). Leave long tail for frills
(do 16 times in total in skin colour for legs)
(do 2 times in total in short colour for shorts)
Finish off, leaving a long tail for joining.
For a frill in second last row of socks attach yarn and do two sc
directly in each st around (optional).
Weave in ends (except joining tail)
Stuff with material of your choosing (plastic bags, yarn scraps, fibre fill)
Arms
Start in skin colour.
Chain 4, sl st in first st
Ch 1, 3 sc, sl st in first st (4)
Ch 1, sc in same st, 2 sc in each st, sl st in first st (8)
Ch 1, sc in each st, sl in first st (8)
(Do 8 times in total in skin colour for arms)
(Do 2 times in total in dress main colour for sleeves)
Finish off, leaving a long tail for joining.
Stuff with material of your choosing (plastic bags, yarn scraps, fibre fill)
Head and Body Base
Make 2 - Head: make in skin colour. Body: start in dress colour, change to shorts colour where indicated.
Chain 4, sl st in first st.
Ch 1 (counts as first sc), 5 sc, sl st in first st (6)
Ch 1, sc in same st, 2 sc in each sc, sl st in first sc (12)
Ch 1, *2 sc in next sc, sc in next sc*, repeat until end, sl in first st
Ch 1, sc in next sc, *2 sc in next sc, sc in next 2 sc*, repeat until end, sl in first st
Ch 1, sc in next 2 sc, *2 sc in next sc, sc in next 3 sc*, repeat until end, sl in first st
Ch 1, sc in next 3 sc, *2 sc in next sc, sc in next 4 sc*, repeat until end, sl in first st
Ch 1, sc in each sc, sl in first st
(Do 8 times in total)
Ch 1, sc in next 3 sc, decrease over next 2 sc, *sc in next 4 sc, decrease over next 2sc*, repeat until end, sl in first st
Ch 1, sc in next 2 sc, decrease over next 2 sc, *sc in next 3 sc, decrease over next 2sc*, repeat until end, sl in first st
(Add filling at this point and change to shorts colour on body)
Ch 1, sc in next sc, decrease over next 2 sc, *sc in next 2 sc, decrease over next 2sc*, repeat until end, sl in first st
Ch 1, decrease over next 2 sc, *sc in next sc, decrease over next 2sc*, repeat until end, sl in first st
Ch 1, decrease over each 2 sc, sl in first st
Leave a long tail and weave through to tighten
Head finishing
Embroider face as desired
Attach hair. Examples of techniques are here and here
Body Finishing
Skirt
In dress colour.
Choose location of skirt and connect yarn. In the first row you are crocheting directly onto the body and so the stitch count may vary.
Ch 3, 2 dc in each st, sl st in first st
Ch 3, 2 dc in each st, sl st in first st
Ch 3, dc in each st, sl st in first st
Change to contrast dress colour
Sl st, *skip stitch, 3 dc in next st, skip stich, sl st* repeat until end. (It’s unlikely this will end up perfectly due to incorrect stitch numbers so there may be an uneven join). Finish off.
Belt
In belt colour.
Choose height of belt. Weave under one and over two stitches. Tie. Either do this prior to attaching limbs and head and use location of knot as a guide, or do it afterwards and position the knot at the doll’s back.
Collar - Crochet directly onto doll after attaching head just below join of head.
Sl st contrasting collar colour onto desired position, 3 dc in same sp, dc in next sp, sc around to front (stitch count will vary), dc in sp 2 prior to start, 3 dc in next sp, sl st in same sp. Finish off
Joining
If using as a dammit doll, joining should be sturdy so sew around each part 2-3 times.
MODIFIED 8th August 2007 to make pattern clearer.
And you want to hit the wall and yell...
Here's a little dammit doll
That you can't do without.
Just grasp it firmly by the legs
And find a place to slam it
And as you whack the stuffing out
Yell, "DAMMIT! DAMMIT! DAMMIT!"
This was quite a good project for getting rid of scraps. It didn't take much of any colour and I stuffed the limbs and body with short, otherwise useless lengths of yarn (from the afghan), and the hair was also made with short bits of yarn, although I ended up having to cut a few extra bits, but from pieces of yarn to short to do much else with. I also stuffed the head with a couple of plastic bags so you get a nice satisfying sound when you whack it against something.
I attached the poem (using a small left over piece of pretty card) with a small bit of ribbon off a clothing label, so in the end I didn't have to buy anything new for this, and I used some other recycled materials.
I bought my friend some glasses too, they always come in handy, and I couldn't spend nothing on her!


If anyone wants to make their own here is a pattern. I wasn't really counting stitches as I was going so that's why there aren't complete stitch counts. As well as that I'm sure there are errors and inconsistencies in this pattern but if you find any let me know and I'll correct it here.
Legs
Start in shoe colour.
Chain 4, sl st in first st.
Ch 1 (counts as first sc), 5 sc, sl st in first st (6)
Ch 1, sc in same st, 2 sc in each sc, sl st in first sc (12)
Ch 1, sc in each st, sl st in first sc (12)
(do 5 times in total in shoe colour for shoes)
(do 7 times in total in sock colour for socks). Leave long tail for frills
(do 16 times in total in skin colour for legs)
(do 2 times in total in short colour for shorts)
Finish off, leaving a long tail for joining.
For a frill in second last row of socks attach yarn and do two sc
directly in each st around (optional).
Weave in ends (except joining tail)
Stuff with material of your choosing (plastic bags, yarn scraps, fibre fill)
Arms
Start in skin colour.
Chain 4, sl st in first st
Ch 1, 3 sc, sl st in first st (4)
Ch 1, sc in same st, 2 sc in each st, sl st in first st (8)
Ch 1, sc in each st, sl in first st (8)
(Do 8 times in total in skin colour for arms)
(Do 2 times in total in dress main colour for sleeves)
Finish off, leaving a long tail for joining.
Stuff with material of your choosing (plastic bags, yarn scraps, fibre fill)
Head and Body Base
Make 2 - Head: make in skin colour. Body: start in dress colour, change to shorts colour where indicated.
Chain 4, sl st in first st.
Ch 1 (counts as first sc), 5 sc, sl st in first st (6)
Ch 1, sc in same st, 2 sc in each sc, sl st in first sc (12)
Ch 1, *2 sc in next sc, sc in next sc*, repeat until end, sl in first st
Ch 1, sc in next sc, *2 sc in next sc, sc in next 2 sc*, repeat until end, sl in first st
Ch 1, sc in next 2 sc, *2 sc in next sc, sc in next 3 sc*, repeat until end, sl in first st
Ch 1, sc in next 3 sc, *2 sc in next sc, sc in next 4 sc*, repeat until end, sl in first st
Ch 1, sc in each sc, sl in first st
(Do 8 times in total)
Ch 1, sc in next 3 sc, decrease over next 2 sc, *sc in next 4 sc, decrease over next 2sc*, repeat until end, sl in first st
Ch 1, sc in next 2 sc, decrease over next 2 sc, *sc in next 3 sc, decrease over next 2sc*, repeat until end, sl in first st
(Add filling at this point and change to shorts colour on body)
Ch 1, sc in next sc, decrease over next 2 sc, *sc in next 2 sc, decrease over next 2sc*, repeat until end, sl in first st
Ch 1, decrease over next 2 sc, *sc in next sc, decrease over next 2sc*, repeat until end, sl in first st
Ch 1, decrease over each 2 sc, sl in first st
Leave a long tail and weave through to tighten
Head finishing
Embroider face as desired
Attach hair. Examples of techniques are here and here
Body Finishing
Skirt
In dress colour.
Choose location of skirt and connect yarn. In the first row you are crocheting directly onto the body and so the stitch count may vary.
Ch 3, 2 dc in each st, sl st in first st
Ch 3, 2 dc in each st, sl st in first st
Ch 3, dc in each st, sl st in first st
Change to contrast dress colour
Sl st, *skip stitch, 3 dc in next st, skip stich, sl st* repeat until end. (It’s unlikely this will end up perfectly due to incorrect stitch numbers so there may be an uneven join). Finish off.
Belt
In belt colour.
Choose height of belt. Weave under one and over two stitches. Tie. Either do this prior to attaching limbs and head and use location of knot as a guide, or do it afterwards and position the knot at the doll’s back.
Collar - Crochet directly onto doll after attaching head just below join of head.
Sl st contrasting collar colour onto desired position, 3 dc in same sp, dc in next sp, sc around to front (stitch count will vary), dc in sp 2 prior to start, 3 dc in next sp, sl st in same sp. Finish off
Joining
If using as a dammit doll, joining should be sturdy so sew around each part 2-3 times.

MODIFIED 8th August 2007 to make pattern clearer.
Thursday, June 08, 2006
New crafty books
I got a couple of new books from a local op-shop (thrift shop for some).
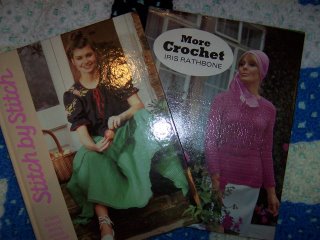
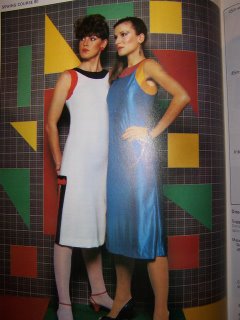
The 'Stitch by Stitch' book is from the 80s and as well as a few crochet patterns (some quite good ones), it's got some knitting stuff, embroidery and sewing. To be honest the best part is laughing at some of the photos...like these very attractive dresses!
The 'More Crochet' book is from the 70s and so also includes some pretty amusing pictures. While this isn't the worst pattern I'm just amused by the drugged out looks on the model's photos. Drugs and crochet, who knew?


The 'Stitch by Stitch' book is from the 80s and as well as a few crochet patterns (some quite good ones), it's got some knitting stuff, embroidery and sewing. To be honest the best part is laughing at some of the photos...like these very attractive dresses!

The 'More Crochet' book is from the 70s and so also includes some pretty amusing pictures. While this isn't the worst pattern I'm just amused by the drugged out looks on the model's photos. Drugs and crochet, who knew?


Tuesday, June 06, 2006
Salsa!
Last night I went to a salsa lesson. They are just around the corner from where I'm living so I should really have gone earlier, but it's a bit scary starting things like that by yourself, and I kept finding excuses to put it off. I'm glad I did go though, even though I was pretty bad, because I had fun and met some new people.
I think it'll take me a while to move up from the beginners class but I'm sure I'll keep enjoying it!
I think it'll take me a while to move up from the beginners class but I'm sure I'll keep enjoying it!
Sunday, June 04, 2006
I've finished
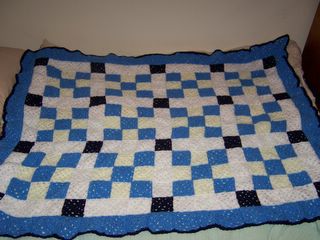
I've finally finished the Nine Patch Afghan!
Finished Afghan!
Overall I'm happy with it but there were a few little issues. I would have liked the yellow and white squares to have a bit more contrast but I basically bought the yarn that was available on the day. Ideally I would have liked to use the yellow instead of the white and then a darker yellow but all I could find was really bright yellows which I don't think would have suited it as well. As well as the colour issue I ended up with varying tension on the lighter blue squares (which I did first) and based on the last few I did I went down a hook size for all the other squares, so some of the blue squares are a bit bulgy. It's not too obvious though, and luckily it is a blanket and not an item of clothing.
I've also decided I don't like sewing together lots of squares. That was the part where I started getting a bit frustrated. Although I've got a great sense of accomplishment now. Hopefully my mum likes it too!

Finished Afghan!

Overall I'm happy with it but there were a few little issues. I would have liked the yellow and white squares to have a bit more contrast but I basically bought the yarn that was available on the day. Ideally I would have liked to use the yellow instead of the white and then a darker yellow but all I could find was really bright yellows which I don't think would have suited it as well. As well as the colour issue I ended up with varying tension on the lighter blue squares (which I did first) and based on the last few I did I went down a hook size for all the other squares, so some of the blue squares are a bit bulgy. It's not too obvious though, and luckily it is a blanket and not an item of clothing.
I've also decided I don't like sewing together lots of squares. That was the part where I started getting a bit frustrated. Although I've got a great sense of accomplishment now. Hopefully my mum likes it too!
Thursday, June 01, 2006
Website review - WikiHow
Just a brief post tonight, because work is busy, and I've got to look after a sick dog. It's doing reasonably well though which is good.
Anyway, I thought I'd do a quick review on a neat new site I found, WikiHow, it's an enormous how to manual, which has a pretty good craft section (why else would I go there!).
It has a wide variety of articles, and the ones I read seemed fairly straight forward and easy to understand. The advantage over craftster (my favourite site in the world!), would be that you can get straight to what you want to find out. Some of the topics could have been named better, and more images would make the articles easier to understand, and lots more fun!
Over all, I'd say it was worth a look!
Subscribe to:
Comments (Atom)

